2 ส.ค. 2554

Create the "shutdown.bat" file


The "shutdown.bat" file is a batch file that can allow you to auto-launch applications and perform tasks just by opening it up. You can make this batch file do pretty much any Windows function you want, but for this tutorial, we are going to write a script to shutdown the computer. Here's how:

1. Open up "Notepad" by going to Start > Run > "Notepad" and then click OK.
2. In the notepad editor, type in:
c:\windows\system32\shutdown -s -f -t 00

ref: http://www.instructables.com/id/Remotely-Shut-Down-Your-Computer-With-A-Cell-Phone/step3/Create-the-shutdownbat-file/

26 ก.ค. 2554

Disable Writing to USB Drives

วิธีการป้องการเขียนข้อมูล Flash Drive ใช้ได้ตั้งแต่ Window Xp Service Pack 2 ขึ้นไป


http://www.howtogeek.com/howto/windows-vista/registry-hack-to-disable-writing-to-usb-drives/

8 ก.ค. 2554

แจก!! โปรแกรมแก้ซึบหมึกเต็ม Canon MX 347,MP 497

เครื่องพิมพ์ Canon รุ่น MX 347 ถ้า "ซึบหมึกเต็ม" หรือทางฝรั่งจะพูดว่า "the waste ink absorber is full" โดยจะออกอาการที่หน้าจอ LED ว่า "Contact Service Center" ถ้าเป็นรุ่น และ MP 497 จะขึ้นหน้าจอว่า "P07" หรือไม่ก็ "E08" แต่เหตุที่ว่าเครื่องพิมพ์ทั้ง 2 รุ่นนี้ไม่สามารถ Clear หรือ Reset ค่าต่างๆ โดยการกดเมนูบนเครื่องพิมพ์เหมือนเครื่องพิมพ์รุ่นเก่าๆได้ จึงจำเป็นต้องใช้โปรแกรม(หายากมาก)ในการเปลี่ยนแปลงค่าต่างๆ ซึ่งปกติก็ต้องส่งเข้าศูนย์บริการ แต่ถ้าเรามีโปรแกรมก็สามารถทำเองได้ที่บ้าน

First of all to solve it you need to download PCM Service tool. Download it from Here After downloading follow these instructions


Step 1: Enter in service mode in order to used the resetter:
•Turn off the printer without pulling the power cords.
•Hold down Resume button and press Power button
•Keep holding down Power button and let Resume button go
•Then Press Resume button 5 times then let both buttons go
•The Alternate Blinking error is gone, the printer is in Service Mode state

Step 2:
•Double click "servicetool.exe"
•Then press "Set" button in the Ink Absorber counter frame after that click OK

•Then power off the printer (sometimes you have to press twice the power button to turn off) and turn on again.
•You have done.

Ref. http://www.fixya.com
http://www.canon.co.uk

28 มิ.ย. 2554

How to Reset Canon MP198, MP258, MP276, MP496, MP558, MP568, and MP648

This is the latest resetter for canon MP198, MP258, MP276, MP496, MP558, MP568, and MP648.

The following are the steps that must be done:

1.Turn on the printer to service mode. how to enter service mode is :
-While the printer is OFF, press and hold the Start/Stop button (Resume/Cancel in some other models).
-While holding the Start/Stop button, press and hold the POWER button.
-When the POWER LED (green light) lit, release the Start/Stop button (still holding the POWER button).
-Press the Start/Stop button TWICE (still holding the POWER button)
-Release the POWER button.
-Wait for the LCD to display 0 (zero).
1. After the display is 0, attach the printer usb cable to pc, then there will be detected new device (it's normal)
2. Run service_tool 1050.exe
3. Confirm detected usb-port numbers on usb port column.
4. Click the MAIN ink counter reset button, make sure there is paper in the paper feed, because the printer will print after the process is complete.
5. Click platern ink counter reset button, the printer will print again.
6. Turn off the printer.
7. Your printer is ready for use again.
Ref http://indoreset.blogspot.com/2010/06/new-canon-resetter-2010.html

30 เม.ย. 2554

Unknown Device: Intel(R) ICH10R LPC Interface Controller - 3A16

MAINBOARD : ASUS P5Q-E motherboard
After Installed all latest drivers (including Intel Chipset Software)... And have this Unknown Device with location "Intel(R) ICH10R LPC Interface Controller - 3A16"

You just need to download and install this Utility
ftp://ftp.asus.com.tw/pub/asus/misc/utils/SixEngine_V10019.zip

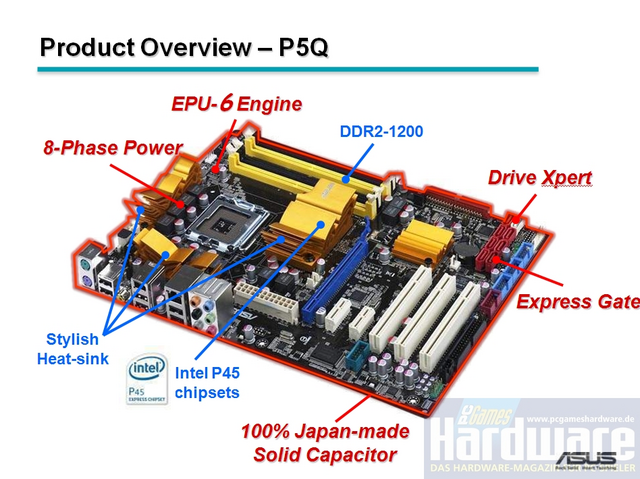
ทำ RAID 1 บน ASUS P5Q

หน้าตาเมนบอร์ด Asus P5Q HDD. : Samsung Sata II ความจุ 1TB จำนวน 2 ลูก

ประกอบ HDD เข้าที่ Mainboard

เข้าไปที่ BIOS ตั้งค่าเป็นแบบ RAID

ระหว่างที่กำลัง Boot ให้กด Ctrl+i เพื่อเข้าสู่หน้าจอจัดการ Raid และเลือกเมนู 1 เพื่อทำการสร้าง Raid

ในช่องNameให้ระบุชื่อ Raid แล้วกด Enter
เมื่อ Raid Level ถูก Hilight ผมเลือกแบบ RAID1
ช่อง Disks : ให้เราเลือก HDD ที่ต้องการทำ Raid
ส่วนช่ิอง Strip Size และ Capacity ก็ปล่อยตามค่าที่ให้มา
เมื่อ Create Volume ถูกเลือกให้กด Enter
กด Y เพื่อรับทราบคำเตือนว่าข้อมูลใน HDD ทั้ง 2ลูกจะหายเกลี้ยง

เมื่อสร้างเสร็จแล้วก็เลือก 4 และกด Y เพื่อออกจากโปรแกรม

หลังจาก Reboot แล้วก็ดำเนินการติดตั้ง OS Windows 2008 (ไม่ต้องสร้าง Raid driver disk)

พื้นที่ ตอนแบ่ง Partion


•RAID 0 -- Striped Disk Array without Fault Tolerance: Provides data striping
(spreading out blocks of each file across multiple disk drives) but no
redundancy. This improves performance but does not deliver fault tolerance. If
one drive fails then all data in the array is lost.


•RAID 1 -- Mirroring and Duplexing: Provides disk mirroring. Level 1 provides
twice the read transaction rate of single disks and the same write
transaction
rate as single disks.


•RAID 5 -- Block Interleaved Distributed Parity: Provides data striping at the
byte level and also stripe error correction information. This results in
excellent performance and good fault tolerance. Level 5 is one of the most
popular implementations of RAID.
•RAID 10 -- A Stripe of Mirrors: Not one of
the original RAID levels, multiple RAID 1 mirrors are created, and a RAID 0
stripe is created over these.


Aus P5Q Manual
http://www.antthai.com/home/article/RAID_Tech(1).htm

29 เม.ย. 2554

วิธีซ่อม ACER Aspire 5551 พัดลม CPU ไม่หมุน

หลังจากที่ได้รับเครื่อง Acer Aspire 5551 และแจ้งมีอาการความร้อนสูง และ Hang บ่อยมาก จึงตั้งใจจะถอดพัดลม CPU มาทำความสะอาด หลังจากที่ได้ทำความสะอาดแล้ว จึงได้ประกอบชิ้นส่วนกลับเข้าไปดังเดิม แล้วจึงได้เปิดสวิตท์ เพื่อทำการทดสอบเรื่องความร้อน พบว่าพัดลม CPU จะหมุนทำงานเพียงประมาณ 2 วินาทีแรกตอนเปิดเครื่องเท่านั้น แล้วจากนั้นก็ไม่ทำงานอีกเลย ผมจึงไปถอดพัดลม CPU ไปตรวจสอบ พบว่าทำงานได้ีปกติดี ผมไม่ทราบสาเหตุ ที่แน่ชัด แต่คิดว่าน่าจะมาจากเมนบอร์ดที่ทำงานไม่ถูกต้องเรื่อง Censor ตรวจจับความร้อน และผมได้ลอง Load default configuartion ใน Bios อาการเดิมก็ยังปรากฎอยู่ ถัดมาผมลอง Flash Bios พบว่า Mainboard รุ่นนี้ไม่มีไพล์ ROM version ใหม่ ก็เลยไม่รู้ว่าจะUpdate ROM ไปเพื่ออะไร ถัดมาผมจึงได้หาแหล่งพลังงานไฟฟ้าจำนวน 5 Volts แหล่งใหม่ เพื่อนำมาใช้หมุนพัดลม CPU พบว่าบน Mainboard ไม่มีแหล่งพลังงานที่เสียบตรงๆ ใช้ง่ายๆได้เลย จึงต้องมีการบัดกรี เพื่อเอาไฟจาก port USB มาใช้หมุนพัดลม


รูปเมนบอร์ดหลังจากถูกบัดกรีแล้ว
แบบแปลนหัว jack USB

หลังจากได้ทดสอบเปิด Laptop แล้วพบว่าพัดลมทำงานได้ดี เย็นสบายเลย แต่ Port USB ที่ถูกดึงไฟไปนั้นไม่รู้จักอุปกรณ์ใดๆอีกเลย