MAINBOARD : ASUS P5Q-E motherboard
After Installed all latest drivers (including Intel Chipset Software)... And have this Unknown Device with location "Intel(R) ICH10R LPC Interface Controller - 3A16"
You just need to download and install this Utility
ftp://ftp.asus.com.tw/pub/asus/misc/utils/SixEngine_V10019.zip
30 เม.ย. 2554
ทำ RAID 1 บน ASUS P5Q
หน้าตาเมนบอร์ด Asus P5Q 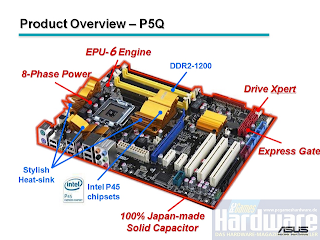 HDD. : Samsung Sata II ความจุ 1TB จำนวน 2 ลูก
 ประกอบ HDD เข้าที่ Mainboard
 เข้าไปที่ BIOS ตั้งค่าเป็นแบบ RAID
 ระหว่างที่กำลัง Boot ให้กด Ctrl+i เพื่อเข้าสู่หน้าจอจัดการ Raid และเลือกเมนู 1 เพื่อทำการสร้าง Raid
 ในช่องNameให้ระบุชื่อ Raid แล้วกด Enter
เมื่อ Raid Level ถูก Hilight ผมเลือกแบบ RAID1
ช่อง Disks : ให้เราเลือก HDD ที่ต้องการทำ Raid
ส่วนช่ิอง Strip Size และ Capacity ก็ปล่อยตามค่าที่ให้มา
เมื่อ Create Volume ถูกเลือกให้กด Enter
 กด Y เพื่อรับทราบคำเตือนว่าข้อมูลใน HDD ทั้ง 2ลูกจะหายเกลี้ยง
 เมื่อสร้างเสร็จแล้วก็เลือก 4 และกด Y เพื่อออกจากโปรแกรม
 หลังจาก Reboot แล้วก็ดำเนินการติดตั้ง OS Windows 2008 (ไม่ต้องสร้าง Raid driver disk)
 พื้นที่ ตอนแบ่ง Partion

 HDD. : Samsung Sata II ความจุ 1TB จำนวน 2 ลูกประกอบ HDD เข้าที่ Mainboard
 เข้าไปที่ BIOS ตั้งค่าเป็นแบบ RAID
 ระหว่างที่กำลัง Boot ให้กด Ctrl+i เพื่อเข้าสู่หน้าจอจัดการ Raid และเลือกเมนู 1 เพื่อทำการสร้าง Raid
 ในช่องNameให้ระบุชื่อ Raid แล้วกด Enter
เมื่อ Raid Level ถูก Hilight ผมเลือกแบบ RAID1
ช่อง Disks : ให้เราเลือก HDD ที่ต้องการทำ Raid
ส่วนช่ิอง Strip Size และ Capacity ก็ปล่อยตามค่าที่ให้มา
เมื่อ Create Volume ถูกเลือกให้กด Enter
 กด Y เพื่อรับทราบคำเตือนว่าข้อมูลใน HDD ทั้ง 2ลูกจะหายเกลี้ยง
 เมื่อสร้างเสร็จแล้วก็เลือก 4 และกด Y เพื่อออกจากโปรแกรม
 หลังจาก Reboot แล้วก็ดำเนินการติดตั้ง OS Windows 2008 (ไม่ต้องสร้าง Raid driver disk)
 พื้นที่ ตอนแบ่ง Partion
•RAID 0 -- Striped Disk Array without Fault Tolerance: Provides data striping
(spreading out blocks of each file across multiple disk drives) but no
redundancy. This improves performance but does not deliver fault tolerance. If
one drive fails then all data in the array is lost.

•RAID 1 -- Mirroring and Duplexing: Provides disk mirroring. Level 1 provides
twice the read transaction rate of single disks and the same write
transaction
rate as single disks.

•RAID 5 -- Block Interleaved Distributed Parity: Provides data striping at the
byte level and also stripe error correction information. This results in
excellent performance and good fault tolerance. Level 5 is one of the most
popular implementations of RAID.
•RAID 10 -- A Stripe of Mirrors: Not one of
the original RAID levels, multiple RAID 1 mirrors are created, and a RAID 0
stripe is created over these.
Aus P5Q Manual
http://www.antthai.com/home/article/RAID_Tech(1).htm
29 เม.ย. 2554
วิธีซ่อม ACER Aspire 5551 พัดลม CPU ไม่หมุน
หลังจากที่ได้รับเครื่อง Acer Aspire 5551 และแจ้งมีอาการความร้อนสูง และ Hang บ่อยมาก จึงตั้งใจจะถอดพัดลม CPU มาทำความสะอาด หลังจากที่ได้ทำความสะอาดแล้ว จึงได้ประกอบชิ้นส่วนกลับเข้าไปดังเดิม แล้วจึงได้เปิดสวิตท์ เพื่อทำการทดสอบเรื่องความร้อน พบว่าพัดลม CPU จะหมุนทำงานเพียงประมาณ 2 วินาทีแรกตอนเปิดเครื่องเท่านั้น แล้วจากนั้นก็ไม่ทำงานอีกเลย ผมจึงไปถอดพัดลม CPU ไปตรวจสอบ พบว่าทำงานได้ีปกติดี ผมไม่ทราบสาเหตุ ที่แน่ชัด แต่คิดว่าน่าจะมาจากเมนบอร์ดที่ทำงานไม่ถูกต้องเรื่อง Censor ตรวจจับความร้อน และผมได้ลอง Load default configuartion ใน Bios อาการเดิมก็ยังปรากฎอยู่ ถัดมาผมลอง Flash Bios พบว่า Mainboard รุ่นนี้ไม่มีไพล์ ROM version ใหม่ ก็เลยไม่รู้ว่าจะUpdate ROM ไปเพื่ออะไร ถัดมาผมจึงได้หาแหล่งพลังงานไฟฟ้าจำนวน 5 Volts แหล่งใหม่ เพื่อนำมาใช้หมุนพัดลม CPU พบว่าบน Mainboard ไม่มีแหล่งพลังงานที่เสียบตรงๆ ใช้ง่ายๆได้เลย จึงต้องมีการบัดกรี เพื่อเอาไฟจาก port USB มาใช้หมุนพัดลม
 รูปเมนบอร์ดหลังจากถูกบัดกรีแล้ว
 แบบแปลนหัว jack USB
หลังจากได้ทดสอบเปิด Laptop แล้วพบว่าพัดลมทำงานได้ดี เย็นสบายเลย แต่ Port USB ที่ถูกดึงไฟไปนั้นไม่รู้จักอุปกรณ์ใดๆอีกเลย
11 เม.ย. 2554
How I can scope dhcp from coovachilli
Add below to /etc/chilli/local.conf is correct
dhcpstart 10
dhcpend 200
you can use dhcpstart and dhcpend options for chilli. These define the start and stop of the range. If set to 10 and 200 respectively, then chilli will allocate the range .10 - .200. These settings are not in the chilli/defaults file, but you can add the chilli options to your chilli/local.conf directly.
Thank you Mr. David
http://coova.org/node/1045
สมัครสมาชิก:
บทความ (Atom)