24 ม.ค. 2554

วิธี Add และ Disable User ใน Daloradius

Daloradius ผมอ่านว่า "ดาโล่เรเดียส" เป็นโปรแกรมที่ถูกเขียนขึ้นเพื่อจัดการผู้ใช้งานที่ต้องการรับบริการอินเตอร์เน็ต

ขั้นตอนการเพิ่ม User หรือ รหัสผู้ใช้งานอินเตอร์เน็ต

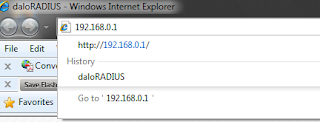
Step 1.เปิดโปรแกรม Brower หรือ Internet Explorer แล้วพิมพ์ 192.168.0.1 ที่ช่อง Address แล้วกด Enter Step 2.พิมพ์ Username และ password แล้ว Click ที่ Login เพื่อเข้าไปจัดการโปรแกรม
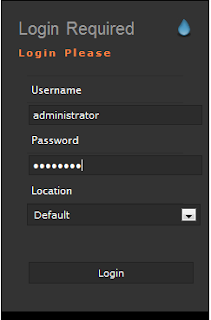
Step 3.ไปที่ เมนู Managemant > Users > New Users

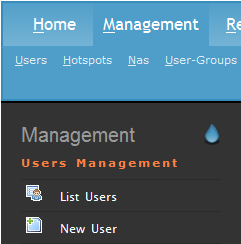
Step 4.ที่ช่องตรงกลางจอภาพ ตรงช่อง Username ให้พิมพ์ชื่อผู้ใช้งาน ต้องเป็นภาษาอังกฤษเท่านั้น และช่อง Password นั้นพิมพ์ได้ตามใจเลย เพราะผู้ใช้งานสามารถเปลี่ยนรหัสผ่านได้เองตอนใช้งานครับ ถัดมาดูที่ช่อง Passwrd Type เลือกแบบ MD5-Password เพื่อป้องการการขโมยรหัสผ่าน และสุดท้ายที่ช่อง Group ให้เลือก Normal User ซึ่งเป็นกลุ่มผู้ใช้งานธรรมดา และต้องคลิ๊กที่ปุ่ม Apply ด้วยนะครับ เพื่อบันทึกข้อมูลที่ได้พิมพ์มา Step 5.หลังจากบันทึกข้อมูลเสร็จแล้ว ต้องมาเพิ่มชื่อจริง นามสุกลจริง และเลขที่บัตรประจำตัวประชาชนของผู้ที่ใช้บริการ ไว้ในฐานข้อมูลด้วย โดยไปที่ เมนูด้ายซ้ายมือ ชื่อว่า List Users Step 6.หลังจากคลิ๊กที่ List Users แล้ว ช่องทางขวา มองหา Username ที่มีชื่อเหมือนกับชื่อ User ที่เราสร้างไปตะกี้ ถ้าพบแล้วให้คลิ๊กที่ชื่อ นั้น ถัดมาจะมีหน้าต่างสีน้ำเงินเล็กโผล่ขึ้นมา ให้เลือก Edit Use Step 7.ต่อมาให้คลิ๊กแถบชื่อว่า User info และให้พิมพ์ข้อมูลรายละเอียดของผู้ใช้งานอินเตอร์เน็ต (ช่อง Email ก็ประยุกต์ใส่รหัสประจำตัวประชาชนแทน ) Step 8. เมื่อพิมพ์เสร็จแล้วให้เลื่อนลงมาด้านล่าง คลิ๊กที่ปุ่ม apply เพื่อบันทึกข้อมูล ตามรูปครับ
จบเพียงนี้สำหรับการเพิ่ม User ต่อไปจะเป็น ขั้นตอนการ Disable หรือ ระงับการใช้งาน

Step 1.หลังจากที่ได้เข้าสู่โปรแกรม Daloradius แล้วให้ไปที่ Managemane>List Users และค้นหาชื่อผู้ใช้ที่ต้อง Disable (ภาพประกอบเหมือน Step 3. ของการเพิ่ม User) ต่อมาจะมีข้อความให้เรายืนยันว่าต้องการระงับการใช้งานใช่ไหม คลิ๊กที่ปุ่ม OK เพื่อยืนยัน

Step 2.ถัดมาให้ติ๊กถูกที่หน้า Username นั้น แล้วให้มาคลิ๊กที่ ปุ่ม Disable ซึ่งอยู่ด้านบน เพียงเท่านี้รหัสผู้ใช้งานอันนี้ก็จะใช้งานต่อไปไม่ได้
คราวนี้ก็มาถึงเหตุการณืที่ว่าถ้าจะนำ Username ที่เคยระงับการใช้งานไป นำกลับมาใช้อีกครั้ง ก็สามารถทำได้ ขั้นตอนตามนี้ครับ

Step 1.ไปที่ Managment>Users>List Users ถัดมาค้นหา Username ที่ต้องการนำกลับมาใช้งาน เมื่อพบแล้วก็ให้คลิ๊กที่ชื่อนั้น แล้วให้เลือก Edit User

Step 2.ให้คลิ๊กที่ ปุ่มกากบาทสีแดงหน้าคำว่า Auth-Type หลังจากคลิ๊กเสร็จก็สามารถนำ User นี้ไปใช้งานต่อไปได้

23 ม.ค. 2554

สิ้นสุดการรอคอย Jailbreak Iphone 4.2.1 บน เครื่อง Window

ผมหาไม่เจอ VDO ที่ทำ Untethered Jailbreak บน IOS 4.2.1 ของ iPhone 4
ดูอันนี้ไปแทนก็ใช้ได้

Download ไพล์เดียวก็พอแล้ว

21 ม.ค. 2554

The Lists of iPhone Firmware

the direct links to the iPhone Firmware Files for every released firmware version

1.0.0:iPhone1,1_1.0_1A543a_Restore.ipsw
1.0.1: iPhone1,1_1.0.1_1C25_Restore.ipsw
1.0.2: iPhone1,1_1.0.2_1C28_Restore.ipsw
1.1.1: iPhone1,1_1.1.1_3A109a_Restore.ipsw
1.1.2: iPhone1,1_1.1.2_3B48b_Restore.ipsw
1.1.3: iPhone1,1_1.1.3_4A93_Restore.ipsw
1.1.4: iPhone1,1_1.1.4_4A102_Restore.ipsw
2.0.0 (2G): iPhone1,1_2.0_5A347_Restore.ipsw
2.0.0 (3G): iPhone1,2_2.0_5A347_Restore.ipsw
2.0.1 (2G): iPhone1,1_2.0.1_5B108_Restore.ipsw
2.0.1 (3G): iPhone1,2_2.0.1_5B108_Restore.ipsw
2.0.2 (2G): iPhone1,1_2.0.2_5C1_Restore.ipsw
2.0.2 (3G): iPhone1,2_2.0.2_5C1_Restore.ipsw
2.1.0 (2G): iPhone1,1_2.1_5F136_Restore.ipsw
2.1.0 (3G): iPhone1,2_2.1_5F136_Restore.ipsw
2.2.0 (2G): iPhone1,1_2.2_5G77_Restore.ipsw
2.2.0 (3G): iPhone1,2_2.2_5G77_Restore.ipsw
2.2.1 (2G): iPhone1,1_2.2.1_5H1_Restore.ipsw
2.2.1 (3G): iPhone1,2_2.2.1_5H11_Restore.ipsw
3.0.0 (2G): iPhone1,1_3.0_7A341_Restore.ipsw
3.0.0 (3G): iPhone1,2_3.0_7A341_Restore.ipsw
3.0.0 (3GS): iPhone2,1_3.0_7A341_Restore.ipsw
3.0.1 (2G): iPhone1,1_3.0.1_7A400_Restore.ipsw
3.0.1 (3G): iPhone1,2_3.0.1_7A400_Restore.ipsw
3.0.1 (3GS): iPhone2,1_3.0.1_7A400_Restore.ipsw
3.1.0 (2G): iPhone1,1_3.1_7C144_Restore.ipsw
3.1.0 (3G): iPhone1,2_3.1_7C144_Restore.ipsw
3.1.0 (3GS): iPhone2,1_3.1_7C144_Restore.ipsw
3.1.2 (2G): iPhone1,1_3.1.2_7D11_Restore.ipsw
3.1.2 (3G): iPhone1,2_3.1.2_7D11_Restore.ipsw
3.1.2 (3GS): iPhone2,1_3.1.2_7D11_Restore.ipsw
3.1.3 (2G): iPhone1,1_3.1.3_7E18_Restore.ipsw
3.1.3 (3G): iPhone1,2_3.1.3_7E18_Restore.ipsw
3.1.3 (3GS): iPhone2,1_3.1.3_7E18_Restore.ipsw
4.0.0 (3G): iPhone1,2_4.0_8A293_Restore.ipsw
4.0.0 (3GS): iPhone2,1_4.0_8A293_Restore.ipsw
4.0.0 (4): iPhone3,1_4.0_8A293_Restore.ipsw
4.0.1 (3G): iPhone1,2_4.0.1_8A306_Restore.ipsw
4.0.1 (3GS): iPhone2,1_4.0.1_8A306_Restore.ipsw
4.0.1 (4): iPhone3,1_4.0.1_8A306_Restore.ipsw
4.0.2 (3G): iPhone1,2_4.0.2_8A400_Restore.ipsw
4.0.2 (3GS): iPhone2,1_4.0.2_8A400_Restore.ipsw
4.0.2 (4): iPhone3,1_4.0.2_8A400_Restore.ipsw
4.1.0 (3G): iPhone1,2_4.1_8B117_Restore.ipsw
4.1.0 (3GS): iPhone2,1_4.1_8B117_Restore.ipsw
4.1.0 (4): iPhone3,1_4.1_8B117_Restore.ipsw
4.2.1 (3G): iPhone1,2_4.2.1_8C148_Restore.ipsw
4.2.1 (3GS): iPhone2,1_4.2.1_8C148a_Restore.ipsw
4.2.1 (4): iPhone3,1_4.2.1_8C148_Restore.ipsw


http://www.iclarified.com/entry/index.php?enid=750

30 Excellent Reasons to Jailbreak Your iPhone

Here are 30 excellent reasons to jailbreak your iPhone:

1.It’s risk-free. Worst case scenario, you can restore your iPhone to factory settings
2.Install third-party applications with Cydia
3.Get MMS with SwirlyMMS
4.Add custom notification sounds and ringtones for free
5.Use a free turn by turn GPS with xGPS
6.Get video recording for your iPhone 2G or 3G with Cycorder
7.Stream live videos with Qik
8.Use Voice Over IP apps over 3G and Edge with VoIPover3G
9.Enable Flash with iMobileCinema
10.Download and save YouTube videos on your iPhone with MxTube
11.Tether your iPhone with PDAnet
12.View your iPhone on your TV with TVOut
13.Play Game Boy, Game Boy Advance, NES and PlayStation games with emulators
14.Watch every single episode of South Park, American Dad, Family Guy, the Simpsons, the Office, and Futurama for free
15.Filter incoming calls with iBlackList
16.Email your voicemails with Voicemail Forwarder
17.Customize the look and feel of your iPhone with WinterBoard
18.Quickly manage your settings preferences with BossPrefs
19.Sort your apps into folders with Categories
20.Run apps in the background with Backgrounder
21.Quickly reply to SMS with iRealSMS
22.Track your lost/stolen iPhone with iLocalis
23.Display information such as emails, SMS, calendar and more directly on your lock screen with IntelliScreen
24.Spoof your caller ID with 123Spoof
25.Change your iPhone fonts with FontSwap
26.Get haptic feedback for your keyboard with HapticPro
27.Show a picture of your contacts in your contact list with Cyntact
28.Transfer files via Bluetooh with iBluenova
29.Enable battery percentage on the 2G and 3G with Battery Percentage
30.Save home button for using long life Quickdo

http://www.iphonedownloadblog.com/2009/07/23/30-reasons-to-jailbreak-your-iphone/

20 ม.ค. 2554

Where does iTunes store/save iPhone Software updates or Firmware files on Windows & Mac

How to Find iPhone OS software on Windows - First enable ‘Show hidden files and folders’ option from Folder options. Now open the directory as per your Windows:

Location on Windows 7 & Vista: C:\Users\User\AppData\Roaming\Apple Computer\iTunes\iPod Software Updates

Location on Windows XP: Documents and Settings\User\Application Data\Apple Computer\iTunes\iPhone Software Updates

You’ll now see iPhone/iPod/iPad Software Updates file with a .ipsw extension, if present.

How to Find iPhone OS software on Mac – iTunes saves the firmware file in hidden folder on Mac. To access firmware files, type the following command in terminal.

Open a Terminal and type: defaults write com.apple.finder AppleShowAllFiles TRUE then type killall Finder

Now navigate to usr/Library/iTunes/iPhone Software Updates/

You’ll now see iPhone/iPod/iPad Software Updates file with a .ipsw extension.

http://webtrickz.com/where-does-itunes-storesave-iphone-software-updates-or-firmware-files-on-windows-mac/

15 ม.ค. 2554

Guinness World Records ได้บันทึกคนสู้ชีวิต

เค้าคือคนที่ Guinness World Records บันทึกว่าเป็นคนที่สามารถพิมพ์ดีดด้วยเท้าเร็วที่สุดในโลก โดย 1 นาที กดไป 251 ตัวอักษร เร็วกว่าผมใช้มือพิมพ์อีก!

6 ม.ค. 2554

การติดตั้ง OS X Leopard บน VMWARE Workstation 7

การติดตั้ง OS X Leopard บน VMWARE Workstation 7

ก่อนที่จะติดตั้ง ต้องเช็คก่อนว่า Enable Hardware-assisted virtualization รึยังใน Bios วิธีการตรวจสอบก็อ่านตามนี้
http://www.microsoft.com/windows/virtual-pc/support/configure-bios.aspx

หลังจาก Enable แล้วก็จัดหาสิ่งที่ต้องมี
1.iDeneb v.1.5.1 คือแผ่นติดตั้ง OS X Leopard ที่ได้มีการ Modify สำหรับเครื่องที่ไม่ใช่ Macintosh ถ้าจะใช้ iTune 10.1 ต้องใช้ version ที่มากกว่า 10.5.7 นะครับลองหาดูตามเวบ bit
2.darwin_snow.iso เอาไว้ล่อตอน Boot ทุกครั้ง (พิเศษหน่อยสำหรับ Vmware)
3.Vmware 7.0.0 build 203739
4.A pre-made Snow Leopard VMX
5.Cpu ต้องเป็น Intel นะ ถ้าเป็น AMD ต้องหาวิธีอื่น

Step One : เปิดโปรแกรม VMWARE Workstation เลยครับ เปิดแล้ว Open .vmx ที่เราได้ Download จากข้อ 4 ต่อมาก็ edit virtual machine


แก้ไขไพล์ Leopard.vmx

.encoding = "UTF-8"
config.version = "8"
virtualHW.version = "7"
maxvcpus = "1"
scsi0.present = "TRUE"
scsi0.virtualDev = "lsilogic"
memsize = "1024"
ide0:0.present = "TRUE"
ide0:0.fileName = "Leopard.vmdk"
ide1:0.present = "TRUE"
ide1:0.autodetect = "FALSE"
ide1:0.deviceType = "cdrom-image"
ethernet0.present = "TRUE"
ethernet0.virtualDev = "e1000"
ethernet0.wakeOnPcktRcv = "FALSE"
ethernet0.linkStatePropagation.enable = "FALSE"
usb.present = "TRUE"
ehci.present = "TRUE"
pciBridge0.present = "TRUE"
pciBridge4.present = "TRUE"
pciBridge4.virtualDev = "pcieRootPort"
pciBridge4.functions = "8"
pciBridge5.present = "TRUE"
pciBridge5.virtualDev = "pcieRootPort"
pciBridge5.functions = "8"
pciBridge6.present = "TRUE"
pciBridge6.virtualDev = "pcieRootPort"
pciBridge6.functions = "8"
pciBridge7.present = "TRUE"
pciBridge7.virtualDev = "pcieRootPort"
pciBridge7.functions = "8"
vmci0.present = "TRUE"
ich7m.present = "TRUE"
smc.present = "TRUE"
roamingVM.exitBehavior = "go"
tools.syncTime = "TRUE"
displayName = "Leopard"
guestOS = "darwin10"
nvram = "Leopard.nvram"
virtualHW.productCompatibility = "hosted"
ft.secondary0.enabled = "TRUE"
printers.enabled = "FALSE"
keyboardAndMouseProfile = "macProfile"
tools.upgrade.policy = "upgradeAtPowerCycle"
powerType.powerOff = "soft"
powerType.powerOn = "soft"
powerType.suspend = "soft"
powerType.reset = "soft"

extendedConfigFile = "Leopard.vmxf"

cpuid.coresPerSocket = "1"
ide1:0.fileName = "D:\lo\darwin_snow.iso"
ethernet0.generatedAddress = "00:0c:29:7a:fc:49"
ethernet0.addressType = "generated"
uuid.location = "56 4d 24 1b 9d 53 05 26-65 df 55 47 a5 7a fc 49"
uuid.bios = "56 4d 24 1b 9d 53 05 26-65 df 55 47 a5 7a fc 49"
cleanShutdown = "FALSE"
replay.supported = "FALSE"
replay.filename = ""
scsi0:0.redo = ""
pciBridge0.pciSlotNumber = "17"
pciBridge4.pciSlotNumber = "21"
pciBridge5.pciSlotNumber = "22"
pciBridge6.pciSlotNumber = "23"
pciBridge7.pciSlotNumber = "24"
scsi0.pciSlotNumber = "16"
usb.pciSlotNumber = "32"
ethernet0.pciSlotNumber = "33"
sound.pciSlotNumber = "-1"
ehci.pciSlotNumber = "35"
vmci0.pciSlotNumber = "36"
vmotion.checkpointFBSize = "16777216"
usb:0.present = "TRUE"
usb:1.present = "TRUE"

ethernet0.generatedAddressOffset = "0"
vmci0.id = "534797610"
usb:1.deviceType = "hub"
usb:0.deviceType = "mouse"
usb.generic.allowHID = "TRUE"
checkpoint.vmState = ""

ide0:0.redo = ""
ethernet0.connectionType = "hostonly"
serial0.present = "FALSE"
floppy0.present = "FALSE"


Step Two : ไม่ต้องแต่งอะไร เปลี่ยนแต่ Load image ชื่อ darwin_snow.iso ก็พอแล้ว(เครื่องผมเป็น Notebook core i5 ไม่เปลี่ยนค่าอะไร ใน .vmx)


Step Three : กด power on the virtual machine


กด F8 รัวๆเลย เอาจนมีหน้าจอขึ้นตามรูป


Step Four : พอหน้าค้างเหมือนรูปข้าง ก็มากด Alt+Ctrl เพื่อจะมา Load แผ่นติดตั้ง OS X บางเวบบอกว่าต้องใช้แบบ writeลงแผ่น DVD นะ ถ้าใช้แบบ ISO จะ boot ไม่ได้ อันี้ลองแล้วไม่จริงนะครับ ลองใช้ไพล์ iso ก็ติดตั้งได้(Drive DVD เป็นอะไรก็เลือก Drive ชื่อนั้น เช่นของผมเป็น drive f:)

กด Save และ Exit

Step Five : save แล้วต้องกด connect ด้วยนะครับที่ CD/DVD แล้วที่หน้าจอก็เลือก C ครับ เพื่อbootจากแผ่น


Step Six : รอสักพัก 3 นาทีได้มั้งแล้วติดตั้งตามปกติ


Step Seven : เมื่อมีการ Restart หรือ Bootครั้งใดต้องใส่ darwin_snow.iso ล่อตลอดเวลา ลำบากดีแท้

http://www.redmondpie.com/how-to-install-os-x-snow-leopard-in-vmware-windows-7-9140301/
http://www.ihackintosh.com/2009/12/install-snow-leopard-in-vmware-7-windows-edition/

Jailbreak on IPhone 4


My IPhone 4
Firmware 4.2.1 (BC148)
Baseband 03.10.01

ก่อนอื่นทำความเข้าใจคำจำกัดความ และเครื่องประเภทต่างๆกันก่อนครับ

คำจำกัดความ

เครื่อง Lock คือเครื่อง AT&T จากอเมริกา ใช้ได้เฉพาะเครือข่าย AT&T เอามาใส่ซิม AIS , DTAC , TrueMove แล้วใช้ไม่ได้
เครื่อง Official Unlock หรือเครื่องที่ Unlock แล้ว คือเครื่องที่ไม่ได้มีการ lock เครือข่ายไว้ ใส่ซิมอะไรก็ใช้ได้หมด
เครื่องศูนย์ เป็นเครื่อง Official Unlock เหมือนกัน (แต่ถ้าซื้อต่างประเทศ ส่วนใหญ่จะ Lock)
Jailbreak คือการทำให้เครื่องสามารถติดตั้งโปรแกรมต่างๆได้ทั้งจาก App Store , Cydia หรือติดตั้งเอง
Baseband คือ Modem Firmware ดูได้จาก Settings -> General -> About -> Modem Firmware
การ Unlock เครื่อง คือการทำให้เครื่องใส่ซิมอะไรก็ใช้งานได้ การ Unlock นี้จะทำได้บนเครื่องที่ Jailbreak แล้วเท่านั้น
•Tethered คือ หลังจากการเจลเบรกจำเป็นที่จะต้องเสียบสายและ boot ไอโฟนด้วยโปรแกรม redsn0w อีกครั้ง เพื่อให้ไอโฟนอยู่ในสถานะ เจลเบรก หรือที่พูดกันบ่อย ๆ ว่าเปิด ปิด เครื่องไม่ได้ตามปกติ
•Untethered คือ เมื่อเจลเบรกแล้ว สามารถเปิดเครื่องได้เองโดยไม่ต้องใช้เครื่องมือใด ๆ ช่วย


การจะ Jailbreak IPhone4 firmware 4.2.1 วันที่ 12 มกราคม ยังไม่ง่ายไปที่ร้านเค้าบอกว่า ทำได้แต่แบบ Tethered แต่ในเวบมีแบบ untehtered แล้ว

http://www.iphone4jailbreak.org/how-to-upgrade-ios-4-2-1-preserving-baseband.html
http://www.iphone4jailbreak.org/ios-4-2-1-redsn0w-un-tethered-jailbreak-redsnow-tutorial.html
http://www.tukkaeit.com/showthread.php?t=1395